Netty EventLoop 事件循环机制
1. 前言
前面几节主要讲解了 Netty 的几种线程模型,基本上都是理论上的东西,那么 Netty 是如何去实现这些线程模型的呢?答案:核心是 EventLoop,今天我们主要介绍 EventLoop 是如何来实现线程模型的。
2. 什么是 EventLoop
源码:
public interface EventLoop extends OrderedEventExecutor, EventLoopGroup {
    EventLoopGroup parent();
}

public interface EventLoopGroup extends EventExecutorGroup {

}

public interface EventExecutorGroup extends ScheduledExecutorService, Iterable<EventExecutor> {

}
通过上面的简单源码,我们发现 EventLoopGroup 就是一个线程池,它是继承 Java 并发包下的定时线程池,而 EventLoop 则是线程池里面的一个子线程。
通过源码查看它们之间的关系,具体如下所示:
public interface EventLoopGroup extends EventExecutorGroup {
    EventLoop next();//返回线程组里面的一个线程
}

public interface EventLoop extends OrderedEventExecutor, EventLoopGroup {
    EventLoopGroup parent();//关联该线程所属的线程组
}
通过以上简单的分析,我们需要掌握的知识点是,Netty 是通过线程池去实现 Reactor 线程模型的,而线程池并不是使用 Java 内置的线程池,而是继承它们并且进行了一定的扩展。就是 EventLoopGroup 和 EventLoop。
3. EventLoop 的架构图
EventLoop 整体的类 UML 关系图还是比较复杂的,Netty 底层主要是以 NIO 为主,因此核心掌握 NioEventLoop 和 NioEventLoopGroup 两个类的结构即可。
NioEventLoopGroup 关系图:
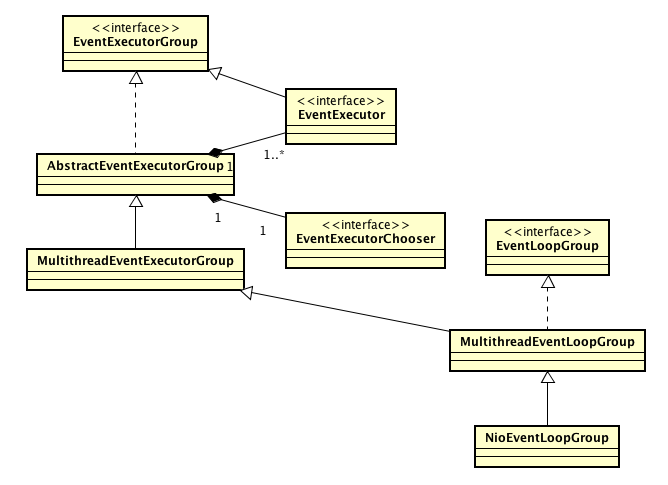
以上的架构图,我们主要关心 NioEventLoopGroup->MultithreadEventLoopGroup->EventLoopGroup,其实这种是比较典型的接口、抽象类、实现类的模式。
NioEventLoop 关系图
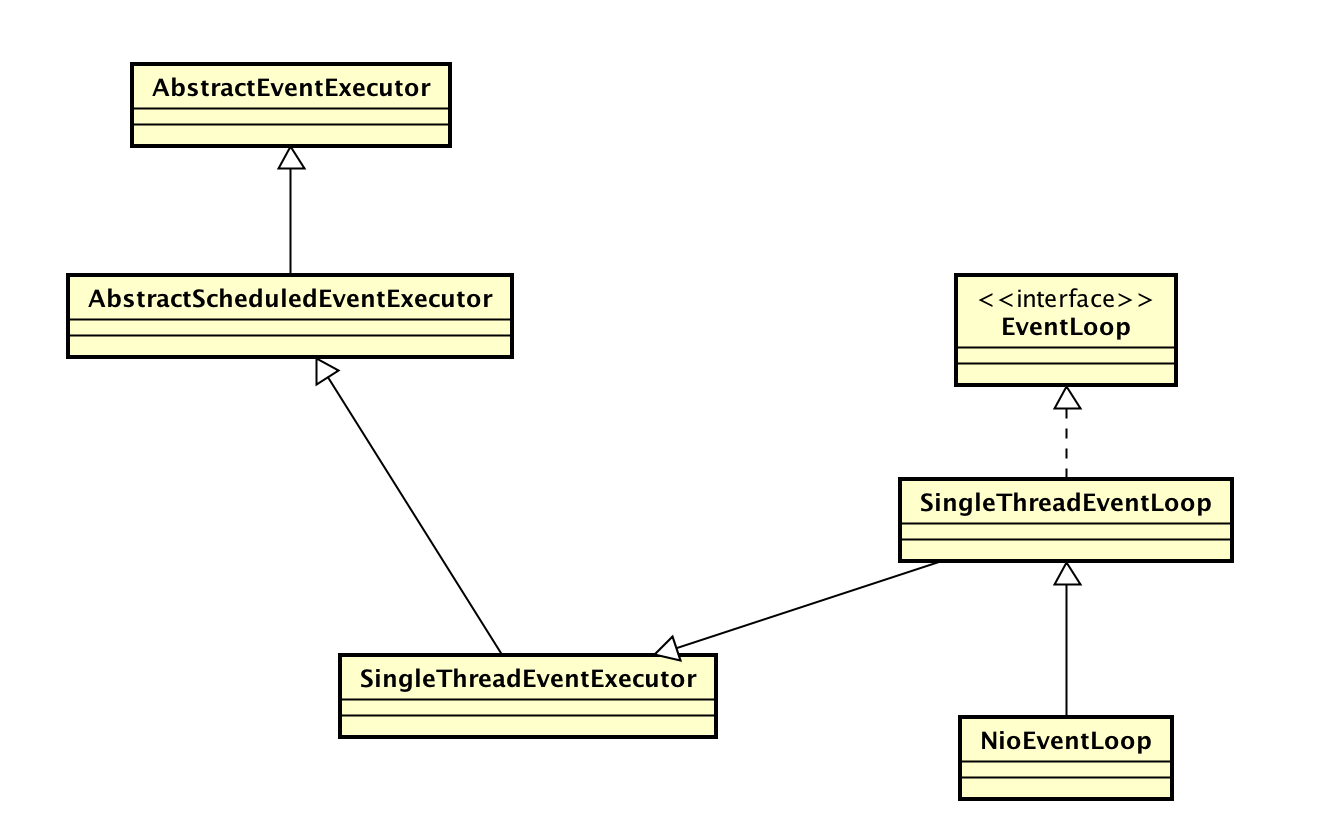
以上的架构图,我们主要关心的是 NioEventLoop->SingleThreadEventLoop->EventLoop,它也是典型的接口、抽象类、实现类的模式。
4. EventLoop 的核心原理
下面,我们将通过源码的方式介绍 EventLoop 在 Netty 当中是如何运行的。
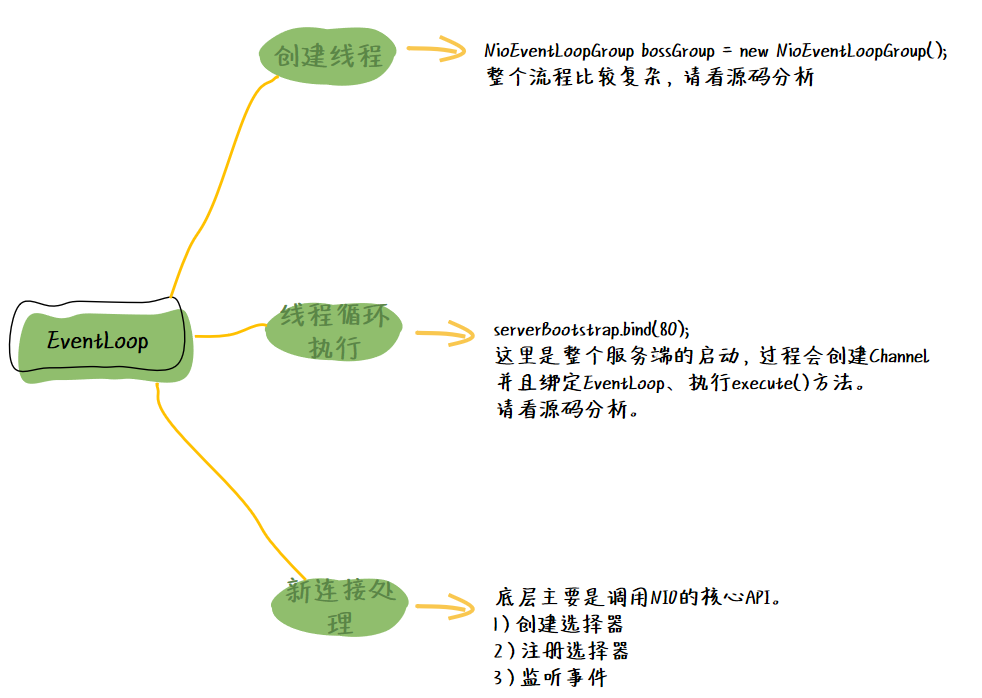
首先,我们需要了解 EventLoop 三个核心步骤,如下图所示:
4.1 EventLoop 的核心作用
EventLoop 的核心作用是,一定客户端连接进来,则服务端给其分配一个 Channel(连接通道),并且会给 Channel 分配一个 EventLoop 和 ChannelPipeline。其中,EventLoop 主要负责该 Channel 相关的业务逻辑处理的,ChannelPipeline 则负责管理业务逻辑(双向链表)。ChannelPipleline 下一个章节会详细讲解。
EventLoop 的核心功能是处理 Channel 相关的业务逻辑,它里面其实是一个死循环,重复做着 3 个事件,分别是
- 监控端口;
- 处理端口事件,将其分发;
- 处理队列事件。
核心结论:每个 EventLoop 可以被绑定到多个 Channel 身上,但是一个 Channel 有且仅有一个 EventLoop 与之进行对应。
4.2 NioEventLoop 初始化流程
这里,我们将通过核心源码来梳理一下 NioEventLoopGroup 的初始化流程,也就是线程池的初始化。
实例:
NioEventLoopGroup bossGroup = new NioEventLoopGroup();
NioEventLoopGroup workerGroup = new NioEventLoopGroup();

ServerBootstrap serverBootstrap = new ServerBootstrap();
serverBootstrap
    .group(bossGroup, workerGroup);
//省略其它代码
第一步: 进入 NioEventLoopGroup 构造函数
public class NioEventLoopGroup extends MultithreadEventLoopGroup {
    public NioEventLoopGroup() {
        //构造函数一直跟进
        this(0);
    }

    public NioEventLoopGroup(
        int nThreads, Executor executor,
        SelectorProvider selectorProvider,
        SelectStrategyFactory selectStrategyFactory) {

        //调用父类的构造函数,点进去,查看源码
        super(nThreads, executor,
              new Object[]{selectorProvider, selectStrategyFactory,
                           RejectedExecutionHandlers.reject()});

    }
}
第二步: MultithreadEventLoopGroup 构造函数
public abstract class MultithreadEventLoopGroup extends MultithreadEventExecutorGroup implements EventLoopGroup {

    protected MultithreadEventLoopGroup(int nThreads, Executor executor, Object... args) {
        //调用父类的构造函数,点进去,查看源码
        super(nThreads == 0 ? DEFAULT_EVENT_LOOP_THREADS : nThreads, executor, args);
    }
}
第三步: MultithreadEventExecutorGroup 构造函数
public abstract class MultithreadEventExecutorGroup extends AbstractEventExecutorGroup {

    //构造函数
    protected MultithreadEventExecutorGroup(int nThreads, ThreadFactory threadFactory, Object... args) {

        //点击跟进
        this(nThreads,
             (Executor)(threadFactory == null ? null : new ThreadPerTaskExecutor(threadFactory)),
             args);
    }

    //核心,在这里进行 “线程组” 初始化工作
    private final EventExecutor[] children;
    protected MultithreadEventExecutorGroup(int nThreads, Executor executor,
                                            EventExecutorChooserFactory chooserFactory, Object... args) {
        //省略了其它代码,只保留核心部分

        //1.创建一个数组,长度是 nThreads
        this.children = new EventExecutor[nThreads];
        //2.数组初始化值
        for(int i = 0; i < nThreads; ++i) {
            //通过 this.newChild() 来创建具体“线程”
            this.children[i] = this.newChild((Executor)executor, args);
        }
    }

    //newChild 是一个抽象类,由子类去进行实现
    protected abstract EventExecutor newChild(Executor var1, Object... var2) throws Exception;
}
第四步: 由子类 NioEventLoopGroup 去实现 newChild () 抽象方法
public class NioEventLoopGroup extends MultithreadEventLoopGroup {
    protected EventLoop newChild(Executor executor, Object... args) throws Exception {
        //创建一个 NioEventLoop
        return new NioEventLoop(this, executor,
                                (SelectorProvider)args[0],
                                ((SelectStrategyFactory)args[1]).newSelectStrategy(),
                                (RejectedExecutionHandler)args[2]);
    }
}
到这里,我们终于看到 NioEventLoop 的身影了,在 newChild () 去进行初始化工作。
4.3 NioEventLoop 执行流程
上面讲解了 NioEventLoop 的初始化流程,那么它到底在什么时候开始执行的呢?
源码入口:
serverBootstrap.bind(80);
第一步: 抽象类 AbstractBootstrap
public abstract class AbstractBootstrap<B extends AbstractBootstrap<B, C>, C extends Channel> implements Cloneable {

    public ChannelFuture bind(int inetPort) {
        return this.bind(new InetSocketAddress(inetPort));
    }

    public ChannelFuture bind(SocketAddress localAddress) {
        this.validate();
        if (localAddress == null) {
            throw new NullPointerException("localAddress");
        } else {
            //继续跟进
            return this.doBind(localAddress);
        }
    }

    private ChannelFuture doBind(final SocketAddress localAddress) {
        //继续跟进
        final ChannelFuture regFuture = this.initAndRegister();
    }

    final ChannelFuture initAndRegister() {
        //继续跟进
        this.init(channel);
    }

    //抽象方法
    abstract void init(Channel var1) throws Exception;
}
第二步: 实现类 ServerBootstrap
public class ServerBootstrap extends AbstractBootstrap<ServerBootstrap, ServerChannel> {
    void init(Channel channel) throws Exception {

        //1.把 ChannelHandler 添加到 ChannelPipeline 里,组成一条双向业务链表
        p.addLast(new ChannelHandler[]{new ChannelInitializer<Channel>() {
            public void initChannel(Channel ch) throws Exception {
                //1.1.管道
                final ChannelPipeline pipeline = ch.pipeline();
                //1.2.添加到管道
                ChannelHandler handler = ServerBootstrap.this.config.handler();
                if (handler != null) {
                    pipeline.addLast(new ChannelHandler[]{handler});
                }
                //1.3.执行线程池的 “execute()”,核心入口
                ch.eventLoop().execute(new Runnable() {
                    public void run() {
                        pipeline.addLast(
                            new ChannelHandler[]{
                                new ServerBootstrap.ServerBootstrapAcceptor(
                                    currentChildGroup,
                                    currentChildHandler,
                                    currentChildOptions,
                                    currentChildAttrs)
                            }
                        );
                    }
                });
            }
        }});
    }
}
这里是在 init () 方法里面进行一序列的初始化工作,并且执行上面初始化好的 NioEventLoop 的 execute () 方法。
第三步: 执行 SingleThreadEventExecutor 的 execute () 方法
public abstract class SingleThreadEventExecutor extends AbstractScheduledEventExecutor implements OrderedEventExecutor {

    public void execute(Runnable task) {
        //是否是当前线程
        boolean inEventLoop = this.inEventLoop();
        if (inEventLoop) {
            //如果是当前线程,则添加任务到队列
            this.addTask(task);
        } else {
            //如果不是当前线程,则先启动线程
            this.startThread();
            //把任务添加到任务队列
            this.addTask(task);
            //如果线程已经关闭并且该任务已经被移除了
            if (this.isShutdown() && this.removeTask(task)) {
                //执行拒绝策略
                reject();
            }
         }
    }

    private void startThread() {
        this.doStartThread();
    }

    private void doStartThread() {
        this.executor.execute(new Runnable() {
            public void run() {
                //执行 run() 方法
                SingleThreadEventExecutor.this.run();
            }
        });
    }

    //抽象方法
    protected abstract void run();
}
第四步: 子类 NioEventLoop 实现抽象方法 run (),这里是 run () 方法是一个死循环,并且执行三个核心事件,分别是 “监听端口”、“处理端口事件”、“处理队列事件”。
public final class NioEventLoop extends SingleThreadEventLoop {
    protected void run() {
        while(true) {
            //省略
        }
    }
}
run () 方法里面核心执行了 this.processSelectedKeys() 和 this.runAllTasks()。
4.4 核心总结
每次执行 execute () 时,都是向队列里面添加任务,当第一次添加时则先启动线程,并且执行子类 NioEventLoop 的 run () 方法。而该 run () 是整个 EventLoop 的核心,主要的核心功能如下:
this.select(),该方法是一个堵塞方法,主要是监听客户端事件;this.processSelectedKeys(),该方法获取监听到的客户端事件,并将其进行分发;this.runAllTasks(),执行队列里面的任务。
5. 小结
本节主要是讲解 EventLoop,它是 Netty 的线程模型的核心,Netty 已经帮我们进行了高度的封装,不需要懂得其原理也不会影响 Netty 的使用,但是如果能了解其核心原理,可以让我们更加深刻的理解 Netty 是如何运转的。
访问者可将本网站提供的内容或服务用于个人学习、研究或欣赏,以及其他非商业性或非盈利性用途,但同时应遵守著作权法及其他相关法律的规定,不得侵犯本网站及相关权利人的合法权利。
本网站内容原作者如不愿意在本网站刊登内容,请及时通知本站,邮箱:80764001@qq.com,予以删除。
