OAuth2 集成 - 构造认证授权服务器
1. 前言
上一节中,我们使用了 Spring Security 提供的社交化组件,实现了利用第三方认证平台完成用户身份识别的过程。
虽然使用第三方平台作为认证中心十分的方便,但是如果我们的系统是在内部环境下使用,或者我们的用户没有注册过 Github、微信这类平台,又或者我们希望自己的平台为其他应用提供认证服务时,就需要考虑创建自己的认证中心了。
本节将重点讨论如何创建自己的 OAuth2 认证中心。
本小节实例开发环境 :
本小节所使用的实例代码是基于 Spring 官网中提供的最小化 HelloWorld 模板创建,请点此下载完整的 HelloWorld 模板压缩包。
- 编译环境:JDK 1.8,点此下载;
- 构建工具:Maven 3.5.3,点此下载;
- 开发工具:VS Code,点此下载、控制台;
- 其他依赖性:
spring-security-oauth2-autoconfigure
2. OAuth2 授权原理介绍
OAuth 的全称为 Open Authorization 即「开放授权」。它被设计成为一个通用安全协议,用于实现桌面应用(包括手机应用)及 B / S 应用的统一 API 鉴权服务。它通过颁发令牌的方式,允许第三方网站在特定时间、操作范围内访问资源而避免了重新输入密码。
OAuth 授权有三个主要特点:
- 简单:易于理解和实现;
- 安全:过程中不暴露敏感信息(如:用户名、密码等);
- 开放:谁都可以用。
OAuth 标准一共出现了两代,1.0 在 2007 年底提出,只适用于浏览器 B / S 应用,后来在 2011 年,OAuth 发布了协议 2.0,并开始支持终端应用的认证。现在 OAuth 2.0 协议基本完全替代了 OAuth 1.0 协议。
OAuth 2.0 有四种授权方式,也就是四种获得令牌的方式,分别是:授权码式、隐蔽式、密码式、客户端凭证式。
2.1 授权码式
这种方式下,APP(或网站)首先申请授权码并保存在客户端(或浏览器)中,再用授权码去换取令牌,并将令牌保存在服务器上。这样就实现了即认证客户端,又认证了服务器。
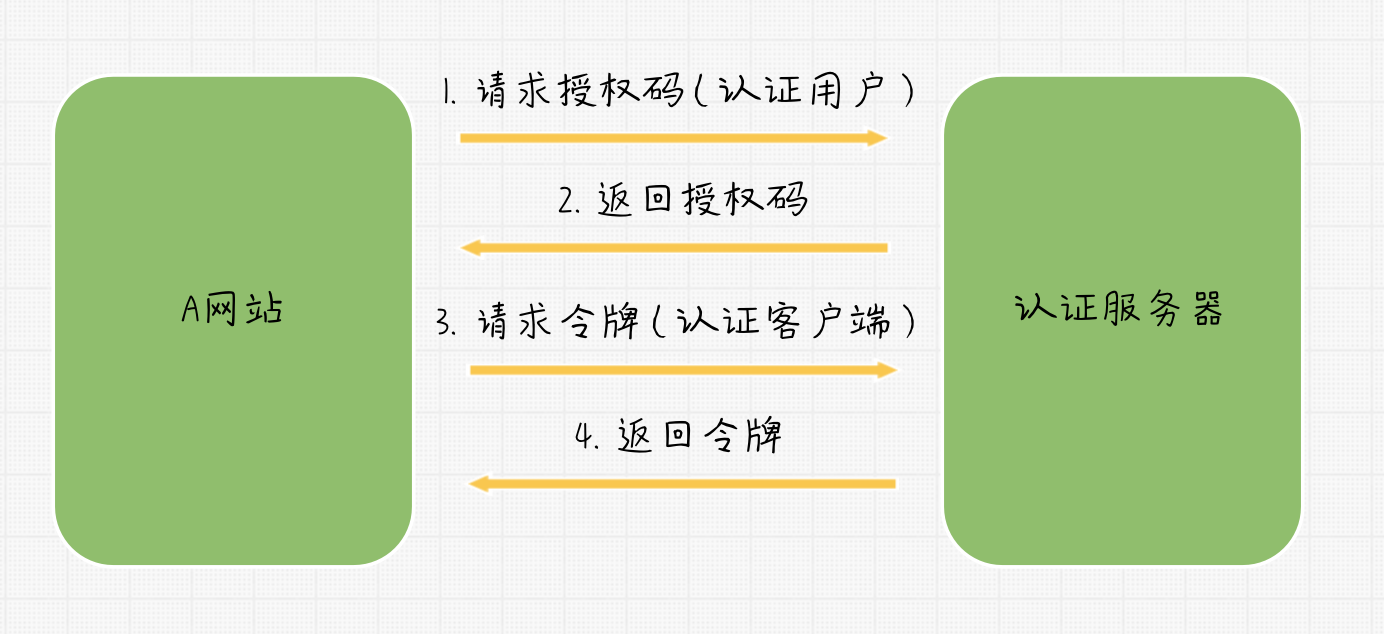
授权码式
2.2 隐蔽式
有时会遇到应用只有前端,没有后端,上述方式就无法实现了,此时我们需要将令牌保存在前端,于是出现了第二种方式:隐蔽式。
这种方式下应用客户端直接向认证服务器请求令牌。
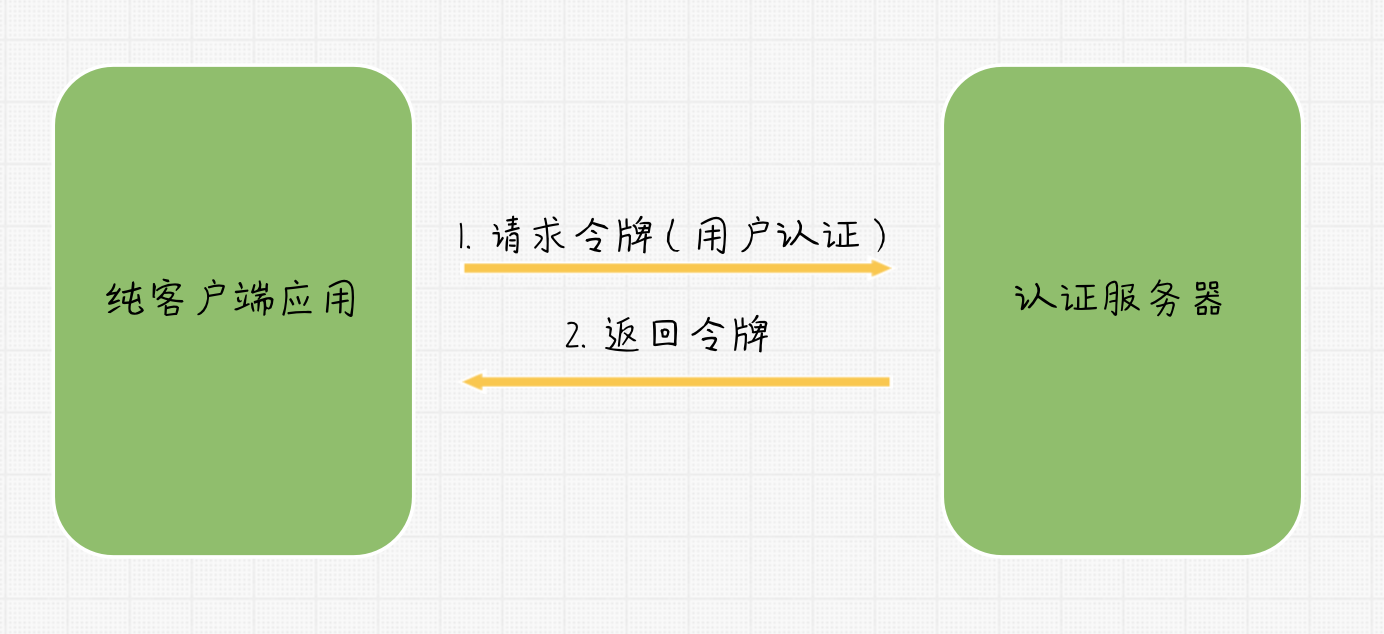
隐蔽式
注意:这种方式下,令牌被存储在客户端,容易被攻击者拦截,所以用完后应及时销毁。
2.3 密码式
加入客户端应用实可信的,既用户允许客户端知道自己的用户名密码,此时就可以使用密码式换取令牌。
这种方式下,由客户端认证用户,并携带用户的认证信息一并发送到认证服务器换取令牌。
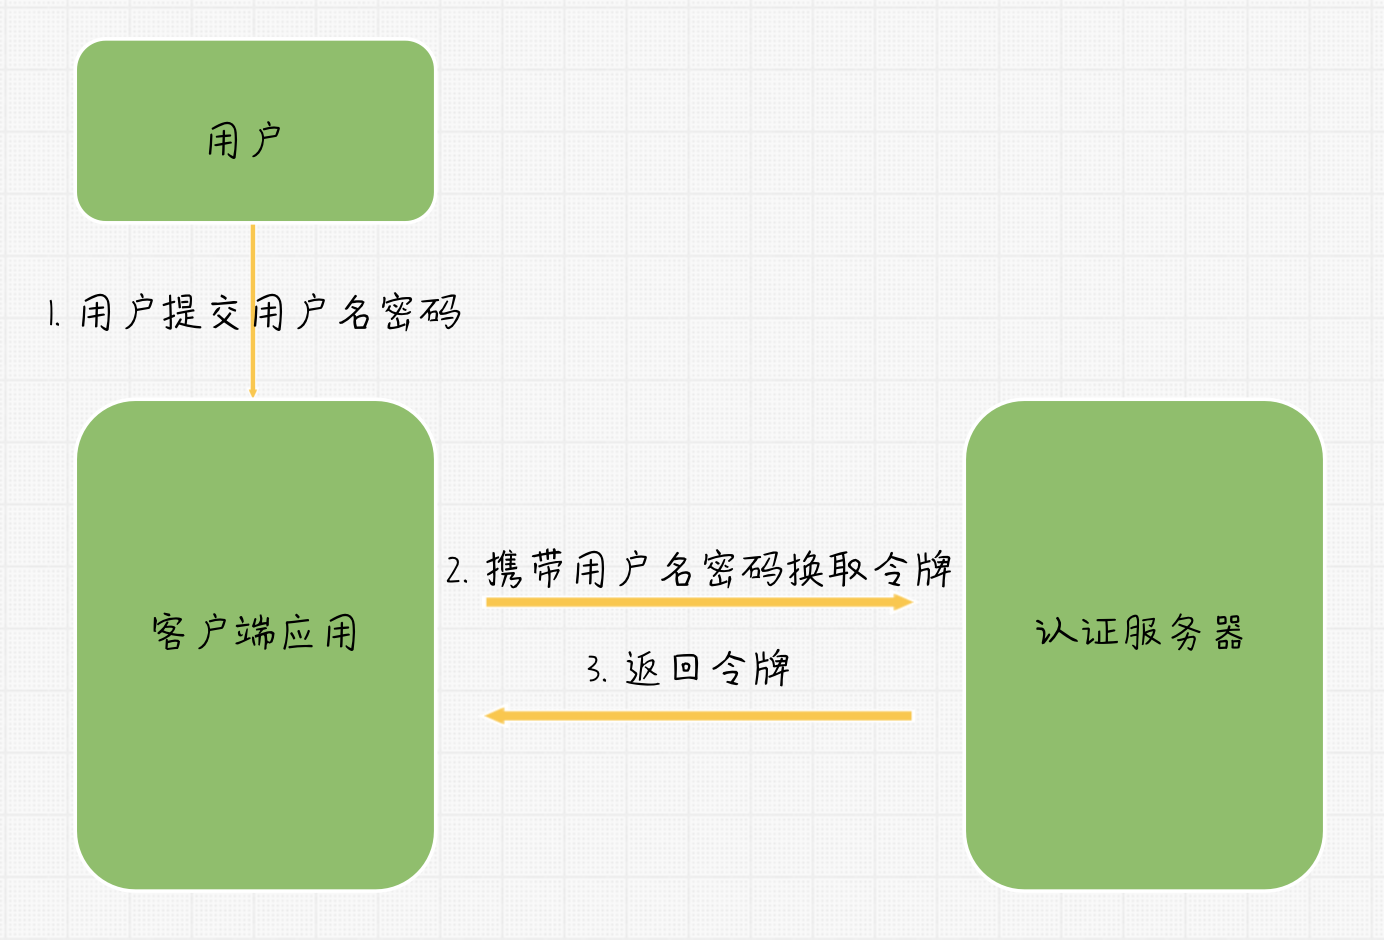
密码式
2.4 客户端凭证式
有的应用并没有明确的前端应用,比如控制台程序或者是服务接口,这种情况下就需要用到客户端凭证式获得凭证了。
这种方式下,没有「人」的参与,只有认证服务对后台服务的认证。
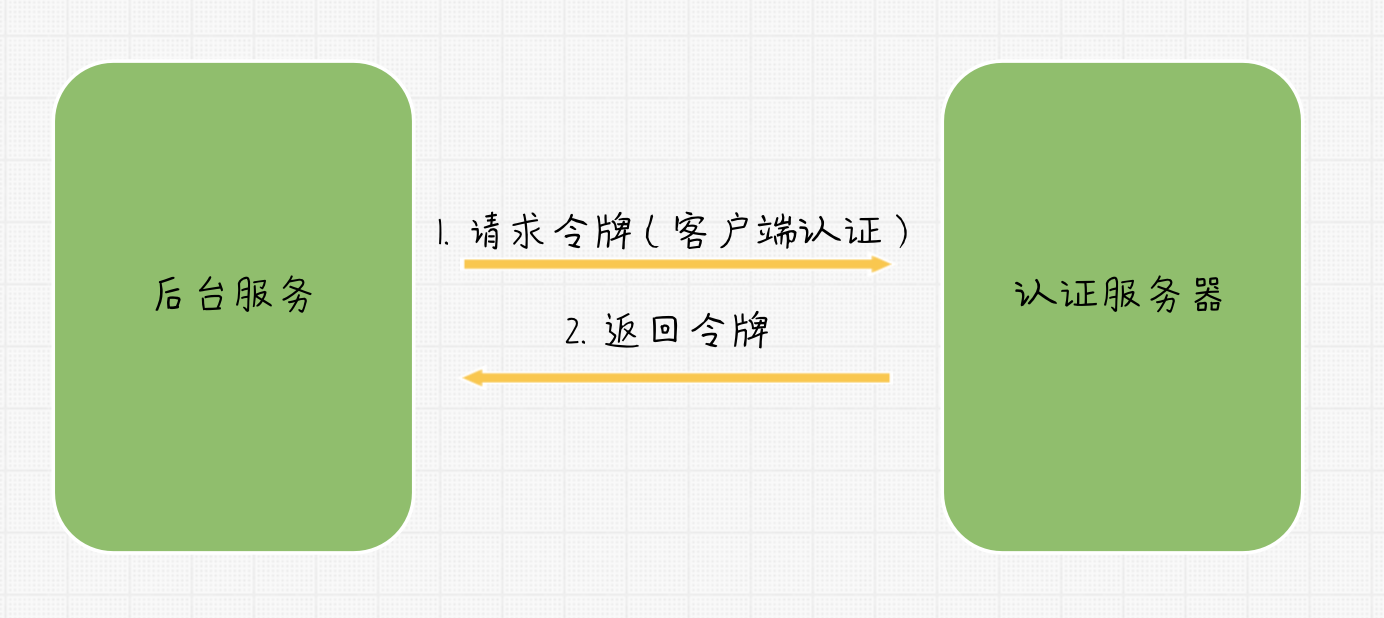
客户端凭证式
3. 过程实现
在前面章节,我们讨论了如何快速建立一个 Spring Security 的认证服务器,此处我们将在前述实例上扩展 OAuth2.0 认证支持。
3.1 创建 Spring Boot web 服务端应用
工程目录结构如下:
▾ OAuth2AuthorizationServer/
  ▾ src/
    ▾ main/
      ▾ java/imooc/springsecurity/oauth2/server/
        ▾ config/
            OAuth2ServerConfiguration.java          # OAuth2 相关配置类
            UserConfiguration.java                  # 基础认证配置类,用于配置用户信息
          OAuth2AuthorizationServerApplication.java # 程序入口
      ▾ resources/
          application.properties                    # 配置文件,本例中无特殊配置
    ▾ test/java/
    pom.xml
在 pom.xml 文件中增加依赖项,相比「用户名密码认证实例」,此处注意添加了 OAuth2 自动配置的相关依赖。spring-security-oauth2-autoconfigure。完整 pom.xml 文件如下:
<?xml version="1.0" encoding="UTF-8"?>
<project xmlns="http://maven.apache.org/POM/4.0.0"
         xmlns:xsi="http://www.w3.org/2001/XMLSchema-instance"
         xsi:schemaLocation="http://maven.apache.org/POM/4.0.0 http://maven.apache.org/xsd/maven-4.0.0.xsd">
    <modelVersion>4.0.0</modelVersion>

    <parent>
        <groupId>org.springframework.boot</groupId>
        <artifactId>spring-boot-starter-parent</artifactId>
        <version>2.3.1.RELEASE</version>
        <relativePath/> <!-- lookup parent from repository -->
    </parent>

    <groupId>imooc.springsecurity</groupId>
    <artifactId>OAuth2AuthorizationServerSample</artifactId>
    <version>0.0.1-SNAPSHOT</version>

    <properties>
        <java.version>1.8</java.version>
    </properties>

    <dependencies>
        <dependency>
            <groupId>org.springframework.boot</groupId>
            <artifactId>spring-boot-starter-security</artifactId>
        </dependency>
        <dependency>
            <groupId>org.springframework.boot</groupId>
            <artifactId>spring-boot-starter-web</artifactId>
        </dependency>
        <dependency>
            <groupId>org.springframework.security.oauth.boot</groupId>
            <artifactId>spring-security-oauth2-autoconfigure</artifactId>
            <version>2.3.1.RELEASE</version>
        </dependency>

        <dependency>
            <groupId>org.springframework.boot</groupId>
            <artifactId>spring-boot-starter-test</artifactId>
            <scope>test</scope>
        </dependency>
        <dependency>
            <groupId>org.springframework.security</groupId>
            <artifactId>spring-security-test</artifactId>
            <scope>test</scope>
        </dependency>
    </dependencies>

    <build>
        <plugins>
            <plugin>
                <groupId>org.springframework.boot</groupId>
                <artifactId>spring-boot-maven-plugin</artifactId>
            </plugin>
        </plugins>
    </build>

</project>
创建 SpringSecurity OAuth2 配置类: OAuth2ServerConfiguration.java。
src/
  main/
    java/
      imooc/
        springsecurity/
          oauth2/
            server/
              OAuth2ServerConfiguration.java
- 使其继承
org.springframework.security.oauth2.config.annotation.web.configuration.AuthorizationServerConfigurerAdapter类,并其增加@EnableAuthorizationServer标签,以声明此类作为 OAuth2 认证服务器的配置依据; - 在
configure(AuthorizationServerEndpointsConfigurer endpoints)方法中配置其 TokenStore,为了便于演示,此例中 TokenStore 采用内存形式,账户信息写死在代码中; - 在
configure(ClientDetailsServiceConfigurer clients)方法中为 OAuth2 认证服务器设置可用于认证的客户端信息。
完整代码如下:
package imooc.springsecurity.oauth2.server.config;

import org.springframework.context.annotation.Bean;
import org.springframework.context.annotation.Configuration;
import org.springframework.security.authentication.AuthenticationManager;
import org.springframework.security.config.annotation.authentication.configuration.AuthenticationConfiguration;
import org.springframework.security.oauth2.config.annotation.configurers.ClientDetailsServiceConfigurer;
import org.springframework.security.oauth2.config.annotation.web.configuration.AuthorizationServerConfigurerAdapter;
import org.springframework.security.oauth2.config.annotation.web.configuration.EnableAuthorizationServer;
import org.springframework.security.oauth2.config.annotation.web.configurers.AuthorizationServerEndpointsConfigurer;
import org.springframework.security.oauth2.provider.token.TokenStore;
import org.springframework.security.oauth2.provider.token.store.InMemoryTokenStore;

@EnableAuthorizationServer
@Configuration
public class OAuth2ServerConfiguration extends AuthorizationServerConfigurerAdapter {

    private AuthenticationManager authenticationManager;

    public OAuth2ServerConfiguration(
            AuthenticationConfiguration authenticationConfiguration) throws Exception {
        this.authenticationManager = authenticationConfiguration.getAuthenticationManager();
    }

    @Override
    public void configure(ClientDetailsServiceConfigurer clients)
            throws Exception {
        // 配置授信客户端信息
        clients.inMemory() // 内存模式
                .withClient("reader") // 第一个客户端用户,其名称为「reader」
                .authorizedGrantTypes("password") // 授权模式为「password」
                .secret("{noop}secret") // 认证密码为「secret」,加密方式为「NoOp」
                .scopes("message:read") // 权限的使用范围
                .accessTokenValiditySeconds(600_000_000) // 票据有效期
                .and()  // 增加第二个授权客户端,设置方法一致,但拥有不同的范围权限
                .withClient("writer")
                .authorizedGrantTypes("password")
                .secret("{noop}secret")
                .scopes("message:write")
                .accessTokenValiditySeconds(600_000_000);
    }
    @Override
    public void configure(AuthorizationServerEndpointsConfigurer endpoints) {
        endpoints
                .authenticationManager(this.authenticationManager)
                .tokenStore(tokenStore()); // 使用虚机内存存储票据信息,也可替换成 Mysql、Redis 等。
    }

    @Bean
    public TokenStore tokenStore() {
        return new InMemoryTokenStore();
    }
}
除了设置授权客户端之外,还要增加客户端中被授权的用户。
创建类 UserConfiguration.java
src/
  main/
    java/
      imooc/
        springsecurity/
          oauth2/
            server/
              UserConfiguration.java
并在其中配置用户信息。
package imooc.springsecurity.oauth2.server.config;

import org.springframework.context.annotation.Bean;
import org.springframework.context.annotation.Configuration;
import org.springframework.security.config.annotation.web.builders.HttpSecurity;
import org.springframework.security.config.annotation.web.configuration.WebSecurityConfigurerAdapter;
import org.springframework.security.core.userdetails.User;
import org.springframework.security.core.userdetails.UserDetailsService;
import org.springframework.security.provisioning.InMemoryUserDetailsManager;

@Configuration
public class UserConfiguration extends WebSecurityConfigurerAdapter {
    @Override
    protected void configure(HttpSecurity http) throws Exception {
        http
                .authorizeRequests()
                .anyRequest().authenticated() // 任何地址都受到保护,需要首先认证
                .and()
                .httpBasic() // 支持基本认证,因为 OAuth2 认证往往用于不同种类客户端,所以基本认证支持是必要的。
                .and()
                .csrf().disable();
    }

    @Bean
    @Override
    public UserDetailsService userDetailsService() {
        InMemoryUserDetailsManager inMemoryUserDetailsManager = new InMemoryUserDetailsManager();
        inMemoryUserDetailsManager.createUser(User.withUsername("admin").password("$2a$10$sR.KWdKOWYseh0KVHHnzMOveh/S7wvOkd.JrTyP2AzHhEcCSZfAmK").roles("USER").build()); // 用户名: admin; 密码: 123456
        return inMemoryUserDetailsManager;
    }
}
3.2 运行及测试
我们用 curl 工具测试 OAuth2.0 认证服务器。
在 OAuth2.0 框架中,实现 Password 认证需要提供四个参数:
- 客户端标识:clientID;
- 客户端认证密码:clientSecret;
- 授权类型:grant_type,该值固定为「password」;
- 认证用户的用户名:username;
- 认证用户的密码:password。
完整的请求表达式为:
curl [clientID]:[clientSecret]@ip:port/oauth/token -d grant_type=password -d username=[username] -d password=[password]
在本实例中,测试指令可定义为:
curl reader:secret@localhost:8080/oauth/token -d grant_type=password -d username=admin -d password=123456
如果认证成功,服务端将返回以下内容:
{
    "access_token": "OOwNfgjvJKHItYnk4buWC8BMGtU=",
    "token_type": "bearer",
    "expires_in": 599995027,
    "scope": "message:read"
}
其中,access_token 值在 OAuth2 体系中作为统一票据,用于各个资源服务的认证。
至此,OAuth2 认证服务器的 Password 模式授权模式就已完成。Spring Security 对 OAuth2.0 的其他几种授权模式已有成熟支持,在使用时需要配置对应的客户端授权模式权限。
3.3 使用数据库作为认证源
如果使用数据库(例如:mysql)作为数据源时,需要创建 JdbcClientDetailsService 对象,并配置到 ClientDetailsServiceConfigurer 之中。具体代码为
    @Bean
    public ClientDetailsService clientDetailsService() {
        // 新增部分,用于从数据库获取客户端信息
        return new JdbcClientDetailsService(dataSource);
    }

    @Override
    public void configure(ClientDetailsServiceConfigurer clients)
            throws Exception {
        // 此处去掉内存配置项,改为 jdbc 数据源
        clients.withClientDetails(clientDetailsService);
    }
除此之外,还需要在书库中插入相关数据表,表结构定义如下,也可以从 spring 项目主页 中获取。
-- used in tests that use HSQL
create table oauth_client_details (
  client_id VARCHAR(256) PRIMARY KEY,
  resource_ids VARCHAR(256),
  client_secret VARCHAR(256),
  scope VARCHAR(256),
  authorized_grant_types VARCHAR(256),
  web_server_redirect_uri VARCHAR(256),
  authorities VARCHAR(256),
  access_token_validity INTEGER,
  refresh_token_validity INTEGER,
  additional_information VARCHAR(4096),
  autoapprove VARCHAR(256)
);

create table oauth_client_token (
  token_id VARCHAR(256),
  token LONGVARBINARY,
  authentication_id VARCHAR(256) PRIMARY KEY,
  user_name VARCHAR(256),
  client_id VARCHAR(256)
);

create table oauth_access_token (
  token_id VARCHAR(256),
  token LONGVARBINARY,
  authentication_id VARCHAR(256) PRIMARY KEY,
  user_name VARCHAR(256),
  client_id VARCHAR(256),
  authentication LONGVARBINARY,
  refresh_token VARCHAR(256)
);

create table oauth_refresh_token (
  token_id VARCHAR(256),
  token LONGVARBINARY,
  authentication LONGVARBINARY
);

create table oauth_code (
  code VARCHAR(256), authentication LONGVARBINARY
);

create table oauth_approvals (
    userId VARCHAR(256),
    clientId VARCHAR(256),
    scope VARCHAR(256),
    status VARCHAR(10),
    expiresAt TIMESTAMP,
    lastModifiedAt TIMESTAMP
);


-- customized oauth_client_details table
create table ClientDetails (
  appId VARCHAR(256) PRIMARY KEY,
  resourceIds VARCHAR(256),
  appSecret VARCHAR(256),
  scope VARCHAR(256),
  grantTypes VARCHAR(256),
  redirectUrl VARCHAR(256),
  authorities VARCHAR(256),
  access_token_validity INTEGER,
  refresh_token_validity INTEGER,
  additionalInformation VARCHAR(4096),
  autoApproveScopes VARCHAR(256)
);
4. 小结
本节我们讨论了如何构建自己的 OAuth2.0 认证中心,主要知识点有:
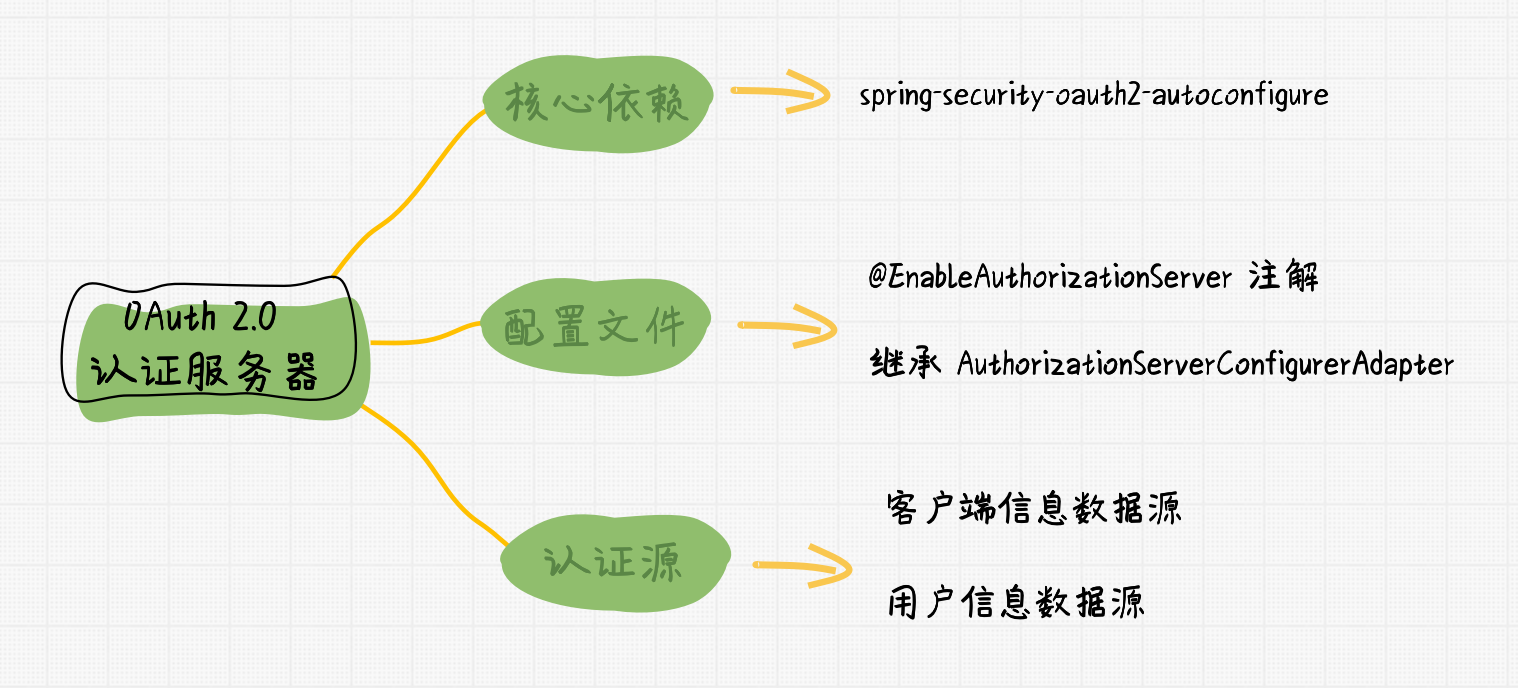
OAuth 2.0 认证服务器
- Spring Security 对 OAuth2.0 认证标准已经有成熟的支持,仅需几个注解就可以构造出 OAuth2.0 认证服务器;
- Spring Security 对 OAuth2.0 认证同样提供了多种认证支持,比如内存认证、数据库认证及 Redis 认证等,可以根据需要进行配置或调整。
下节我们继续 OAuth2.0 话题,讨论如何在 OAuth2.0 协议下,如何保护私密资源被合理访问。
访问者可将本网站提供的内容或服务用于个人学习、研究或欣赏,以及其他非商业性或非盈利性用途,但同时应遵守著作权法及其他相关法律的规定,不得侵犯本网站及相关权利人的合法权利。
本网站内容原作者如不愿意在本网站刊登内容,请及时通知本站,邮箱:80764001@qq.com,予以删除。
