OAuth2 集成 - 构造资源服务器
1. 前言
上一节中,我们使用了 Spring Security 构造了自己的认证服务器,本节中我们将继续讨论如何将构建资源服务器。
资源服务器负责提供受保护的资源,客户端访问这些受保护的资源时需要现在 OAuth2.0 认证中心核验身份及权限,核验的依据是用户认证通过后获得的 token,本节我们讨论资源服务器的实现方法。
本小节实例开发环境 :
本小节所使用的实例代码是基于 Spring 官网中提供的最小化 HelloWorld 模板创建,请点此下载完整的 HelloWorld 模板压缩包。
- 编译环境:JDK 1.8,点此下载;
- 构建工具:Maven 3.5.3,点此下载;
- 开发工具:VS Code,点此下载、控制台;
- 其他依赖性:
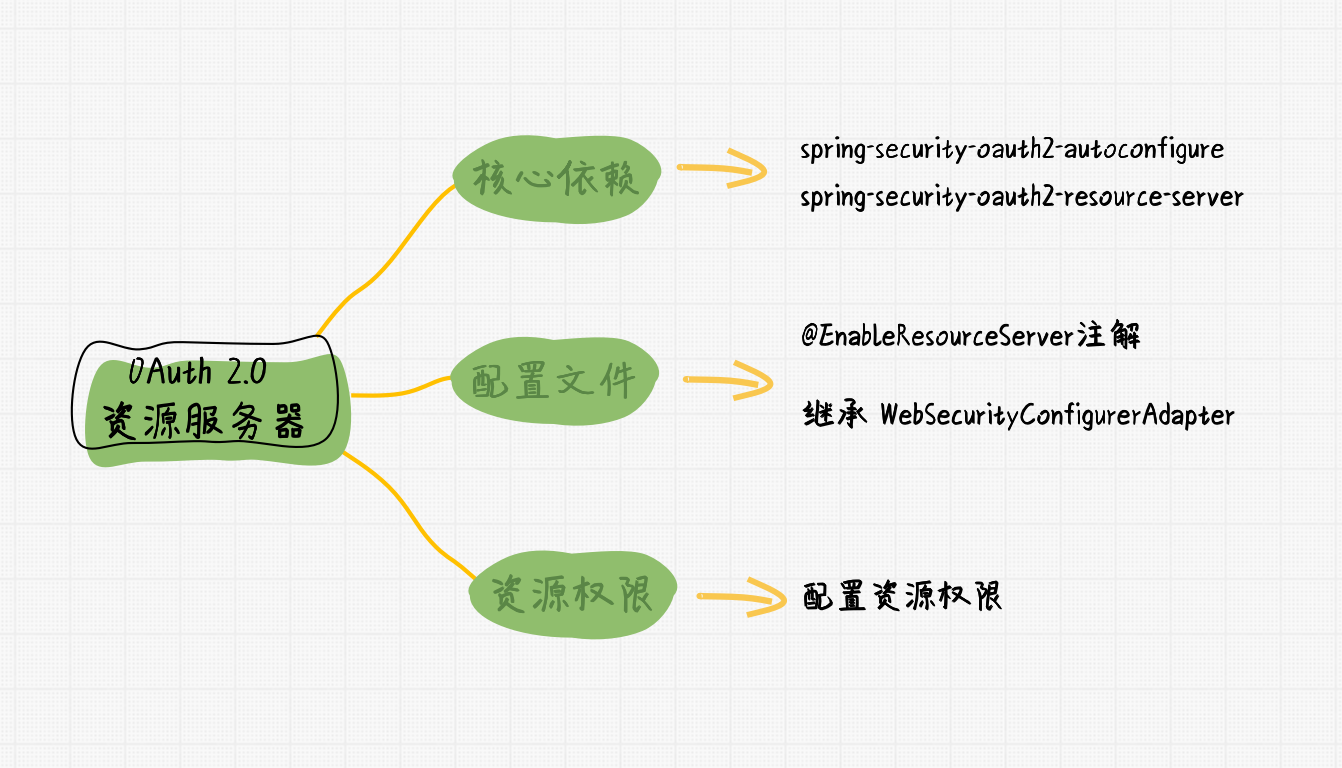
spring-security-oauth2-resource-serverspring-security-oauth2-autoconfigure
2. 过程实现
在前面章节,我们讨论了如何快速建立一个 Spring Security 的认证服务器,此处我们将在上一例的认证服务器基础上增加资源服务器。
2.1 创建 Spring Boot web 服务端应用
工程目录结构如下:
▾ OAuth2ResourceServer/
  ▾ src/
    ▾ main/
      ▾ java/imooc/springsecurity/oauth2/server/
        ▾ config/
            OAuth2ResourceServerController.java            # 配置控制器,用来扮演资源
            OAuth2ResourceServerSecurityConfiguration.java # 资源服务器相关配置均在此处
          OAuth2ResourceServerApplication.java             # 启动类
      ▾ resources/
          application.yml                                  # 配置 OAuth2.0 认证服务器的地址等信息
    ▸ test/
    pom.xml
在 pom.xml 文件中增加依赖项,相比「用户名密码认证实例」,此处注意添加了 OAuth2 自动配置的相关依赖。spring-security-oauth2-autoconfigure 和 spring-security-oauth2-resource-server。完整 pom.xml 文件如下:
<?xml version="1.0" encoding="UTF-8"?>
<project xmlns="http://maven.apache.org/POM/4.0.0"
         xmlns:xsi="http://www.w3.org/2001/XMLSchema-instance"
         xsi:schemaLocation="http://maven.apache.org/POM/4.0.0 http://maven.apache.org/xsd/maven-4.0.0.xsd">
    <modelVersion>4.0.0</modelVersion>

    <parent>
        <groupId>org.springframework.boot</groupId>
        <artifactId>spring-boot-starter-parent</artifactId>
        <version>2.3.1.RELEASE</version>
        <relativePath/> <!-- lookup parent from repository -->
    </parent>

    <groupId>org.example</groupId>
    <artifactId>OAuth2ResourceServer</artifactId>
    <version>0.0.1-SNAPSHOT</version>

    <properties>
        <java.version>1.8</java.version>
    </properties>

    <dependencies>
        <dependency>
            <groupId>org.springframework.boot</groupId>
            <artifactId>spring-boot-starter-web</artifactId>
        </dependency>
        <dependency>
            <groupId>org.springframework.security</groupId>
            <artifactId>spring-security-oauth2-resource-server</artifactId>
            <version>5.3.2.RELEASE</version>
        </dependency>
        <dependency>
            <groupId>org.springframework.security.oauth.boot</groupId>
            <artifactId>spring-security-oauth2-autoconfigure</artifactId>
            <version>2.2.5.RELEASE</version>
        </dependency>
    </dependencies>

    <build>
        <plugins>
            <plugin>
                <groupId>org.springframework.boot</groupId>
                <artifactId>spring-boot-maven-plugin</artifactId>
            </plugin>
        </plugins>
    </build>

</project>
创建 SpringSecurity OAuth2 资源服务器配置类,src/main/java/imooc/springsecurity/oauth2/server/OAuth2ResourceServerSecurityConfiguration.java。
- 使其继承
org.springframework.security.config.annotation.web.configuration.WebSecurityConfigurerAdapter类,并其增加@EnableResourceServer标签,以声明此类作为 OAuth2 资源服务器的配置依据; - 在
configure(HttpSecurity http)方法中配置其资源的访问权限,本例中默认所有资源需要认证用户才能访问;
完整代码如下:
package imooc.springsecurity.oauth2.server.config;

import org.springframework.context.annotation.Configuration;
import org.springframework.security.config.annotation.web.builders.HttpSecurity;
import org.springframework.security.config.annotation.web.configuration.WebSecurityConfigurerAdapter;
import org.springframework.security.oauth2.config.annotation.web.configuration.EnableResourceServer;

@Configuration
@EnableResourceServer
public class OAuth2ResourceServerSecurityConfiguration extends WebSecurityConfigurerAdapter {

    @Override
    protected void configure(HttpSecurity http) throws Exception {
        http
                .authorizeRequests(authorizeRequests ->
                        authorizeRequests.anyRequest().authenticated()
                )
                .csrf().disable();
    }
}
在 application.yml 文件中,需要将 OAuth2.0 认证服务器的信息配置进去。
server:
  port: 8081

security:
  oauth2:
    client:
      client-id: reader  # 客户端标识,与认证服务器中的写法相同
      client-secret: secret # 客户端秘钥,与认证服务器中的写法相同
      user-authorization-uri: http://localhost:8080/oauth/authorize  # 客户端鉴权地址
      access-token-uri: http://localhost:8080/oauth/token # 客户端获取 Token 地址
    resource:
      id: reader # 资源服务器标识,这里可以根据业务情况填写
      token-info-uri: http://localhost:8080/oauth/check_token # 验证 Token 的地址
至此,资源服务器的核心内容均配置完成。
2.2 运行及测试
我们用 curl 工具测试 OAuth2.0 资源服务器。
测试流程如下:
-
利用前一小节的指令向认证服务器获取票据 Token;
curl reader:secret@localhost:8080/oauth/token -d grant_type=password -d username=admin -d password=123456
获得结果:
{
    "access_token": "8b7a6968-cf6e-40d0-a988-f3260f7836a6",
    "token_type": "bearer",
    "expires_in": 599995027,
    "scope": "message:read"
}
-
使用 Token 作为参数,请求资源服务器上的内容,此时需要在请求中增加认证头信息「Authorization」。
curl --location --request GET 'http://localhost:8081/' \ --header 'Authorization: Bearer 8b7a6968-cf6e-40d0-a988-f3260f7836a6'
如果验证成功,返回资源服务器内对应内容;
如果验证失败,返回 401 错误信息,提示 token 验证失败。
{
  "error":"invalid_token",
  "error_description":"8b7a6968-cf6e-40d0-a988-f3260f7836a6"
}
3. 小结
本节我们讨论了 OAuth2.0 规范下资源服务器的构建方式,主要知识点有:
OAuth 2.0 资源服务器
- Spring Security 支持通过注解形式构造资源服务器;
- 资源服务器接收客户端传来的 Token,并交由认证服务器检查 Token 的有效性。
至此,关于 Spring Security 如何集成 OAuth2.0 的内容就告一段落了,下节我们将讨论一种在大企业中常被用作统一身份解决方案的认证框架:「SAML2.0」。
访问者可将本网站提供的内容或服务用于个人学习、研究或欣赏,以及其他非商业性或非盈利性用途,但同时应遵守著作权法及其他相关法律的规定,不得侵犯本网站及相关权利人的合法权利。
本网站内容原作者如不愿意在本网站刊登内容,请及时通知本站,邮箱:80764001@qq.com,予以删除。
